On this page
The examples in this section show a selection of common use cases for Formulas. Each example includes a table that identifies the types of triggers, steps, and variables used in the formula. The table also identifies any prerequisites required, like a connector with events. Lastly, each example includes a downloadable JSON file that you can use to create your own version of the example template with the POST /formulas endpoint.
CRM to Messages
This example listens for an event on a CRM connector and then sends an email with that event information using a messaging connector. This example was tested with the Salesforce Sales Cloud and SendGrid connectors.
| Trigger | Step Types | Variable Types | Prerequisites | Template JSON |
|---|---|---|---|---|
| Event | Connector Instance |
| Formula JSON |
To create a formula that listens for an event and emails a message:
- Build a formula template and select Event as the trigger.
- Because the trigger is a change to a CRM connector, add a connector instance variable that refers to a CRM connector.
- Click
 .
. - Click Add New Variable, and then click Connector Instance.
- Enter a name for your CRM variable. In this example, we'll use
crmElement. - Click Save.
- Select the variable that you just created (
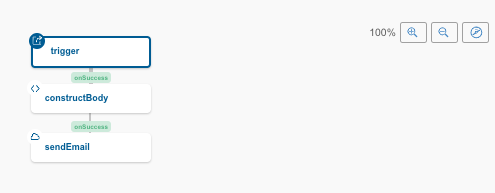
crmElement), and then click Save on the Edit event: "trigger" page.Your formula visualization should look like the following example:

- Click
Add another connector instance variable for the messaging connector.
- Click Variables.

- Click Connector Instance.
- Enter a name. For this tutorial we'll call it
messagingElement. - Click Save.
- Click Variables.
In the formula visualization, click
 to add a step.
Create a JS Script step that constructs a message when the trigger happens.
- Click JS Script.
- Enter a name for the script. We'll call it
constructBody. - Enter a script that constructs a message, such as the example below.
  done( {
  "subject": "CRM Event Occurred",
  "to": "receipient@cloud-elements.com",
  "from": "sender@cloud-elements.com",
  "message": `${trigger.event.objectType} with ID ${trigger.event.objectId} was ${trigger.event.eventType}`
});
Click Save.
Create a Connector API Request step to send the message that you created in the previous step. Click the constructBody step, and then click Add OnSuccess.
- Select Connector API Request.
- Enter a name for the step. We'll call it
sendEmail. - In Connector Instance Variable, click , and then select the messagingElement variable that we created earlier.
- In Method, select POST because the formula will submit a POST request to the messaging hub to send an email.
- In API, enter the API used to send email messages. In this case, enter
/messages. - Click Show Advanced.
- Scroll to Body and enter the reference to the email that we constructed earlier. In this case, type
${steps.constructBody}. - Click Save.
 .
. to add a step.
Your formula should look like the visualization below. It should include a trigger and two steps: the first constructs an email and the second sends a message.
Add New Contact Created in One System to Another
This example listens for a new contact on one connector instance, and then adds the new contact to another connector instance. The trigger for the formula is an Event. When a new contact is created at a connector instance that has events set up, the trigger receives a payload with the raw contact information. Because this raw data cannot be used to create the same contact at a different connector instance, the formula uses the objectID from the trigger to get the transformed contact instead. The formula then posts the transformed contact to the target connector instance.
For this example to work, you must define a common resource to transform the data received from Salesforce.
This example was tested with the Salesforce Sales Cloud and HubSpot CRM connectors.
| Trigger | Step Types | Variable Types | Prerequisites | Template JSON |
|---|---|---|---|---|
| Event | Connector Instance |
| Formula JSON |
To create a formula that adds new contacts created in one system to another:
- Build a formula template and select Event as the trigger.
- Because the trigger originates from a connector instance configured to listen for events, add a connector instance variable.
- Click .
- Click Add New Variable, and then click Connector Instance.
- Enter a name for your CRM variable. In this example, we'll use
originInstance. - Click Save.
- Select the variable that you just created (
originInstance), and then click Save.Your formula visualization should look like the following example:
- Click
Add another Connector Instance variable to represent the system to update after you create a contact at the
originInstance.- Click Variables.
- Click Connector Instance.
- Enter a name. For this tutorial we'll call it
destinationInstance. - Click Save.
- Click Variables.
In the formula visualization, click
to add a step.Create a JS Filter step that checks to be sure the event is a created contact, and not an updated or deleted contact.
- Click JS Filter (true/false).
- Enter a name for the script. We'll call it
isCreateContact. - Enter a script that checks to be sure the event was caused by a created object, such as the example below.
  let theEvent = trigger.event.eventType;
  let theObject = trigger.event.objectType;

  done((theEvent === 'CREATED') && (theObject === 'Contact' || theObject === 'contacts'));
Create a Connector API Request step to retrieve the transformed version of the newly created object based on the
objectIdin the trigger. Click the isCreateContact step, and then click Add OnSuccess.Note: This step uses theobjectIdfrom the trigger to retrieve the transformed object. If you just retrieved the information about the object from the event payload in the trigger, it would not be transformed and could not sync with another connector.- Select Connector API Request.
- Enter a name. For this tutorial we'll call it
retrieveOriginalContact. - In Connector Instance Variable, click , and then select the originInstance variable that we created earlier.
- In Method, select GET because the formula will submit a GET request to a common resource.
- In API, retrieve the transformed newly created contact by entering the endpoint of the common resource and specifying the
objectIdfrom the trigger. For this tutorial, the common resource is calledmyContacts./MyContacts/${trigger.event.objectId} Click Save.
Create a Connector API Request step to add the contact to another connector instance. Click the retrieveOriginalContact step, and then click Add OnSuccess.
- Select Connector API Request.
- Enter a name. For this tutorial we'll call it
createContact. - In Connector Instance Variable, click , and then select the destinationInstance variable that we created earlier.
- In Method, select POST because the formula will submit a POST request to sync the contact.
- In API, enter the API to the common resource. For this tutorial, the common resource is called
myContacts./MyContacts - Click Show Advanced.
- Scroll to Body and enter the reference to the step with the transformed contact data. In this case, type
${steps.retrieveOriginalContact.response.body}. This inserts the body from theretrieveOriginalContactstep—the JSON describing the transformed contact—in the POST request to thedestinationInstance. - Click Save.
Your formula is finished and should look like the visualization below. It should include a trigger and three steps: the first checks that an event is a created contact, the second gets the transformed contact data, and the third syncs the contact. 
Bulk Transfer CRM Data
Bulk data transfer is a common use case. For example, your first sync between CRM systems or maybe you add many accounts or contacts each day and want a single job to run to sync between systems. This example demonstrates how to use two Formulas to complete a bulk transfer.
| Trigger | Step Types | Variable Types | Prerequisites | Template JSON |
|---|---|---|---|---|
|
|
Formula 1
To create a formula that makes a bulk query and then triggers the second formula that will download and then upload the bulk files:
- Build a formula template and select Scheduled as the trigger.
- Add a cron string to identify when the sync occurs.
This example fires every Monday through Friday at 1:00 a.m..
0 0 1 ? * MON,TUE,WED,THU,FRI * Add three variables for the 1) The resource that you want to sync (like
accountorcontact), 2) The connector instance that includes the resources that you want to sync and, 3) The formula instance id associated with the second formula (Formula 2) in this process.- Click Variables.
- Click Value.
- Enter a name for the variable that represents the resource that you want to sync. For this tutorial we'll call it
resourceName. - Click Save.
- Repeat to create a Value variable called
stepTwoId. - Create a Connector Instance variable named
originInstance.
- Click Variables.
In the formula visualization, click
to add a step.Create a JS Script step that builds the metadata for the bulk query, including the OCNQL query that requests a specific resource and the callback URL that will be the formula execution endpoint that executes Formula 2.
- Click JS Script.
- Enter a name for the script. We'll call it
buildMetaData.
  done ({
      "query":{
        "q":"select * from " + config.resourceName
      },
      "headers":{
        "Elements-Async-Callback-Url":"/formulas/instances/" + config.stepTwoId + "/executions"
      }
    });
Create a Connector API Request step to make a bulk download query, referencing the query and callback URL created in buildMetaData. Click the buildMetaData step, and the click Add OnSuccess.
- Select Connector API Request.
- Enter a name. For this tutorial we'll call it
bulkQuery. - In Connector Instance Variable, click , and then select the originInstance variable that we created earlier.
- In Method, select POST because the formula will submit a POST request to the resource.
- In API, enter the endpoint to make a bulk query.
/bulk/query - Click Show Advanced.
- In Headers, enter the reference to the headers that you built in the script in the
buildMetaDatastep. In this case, type${steps.buildMetaData.headers}. - In Query, enter the reference to the query that you built in the script in the
buildMetaDatastep. In this case, type${steps.buildMetaData.query}. - Click Save.
The first formula should look like the visualization below. It should include a trigger and two steps: the first builds the metadata for a bulk query, and the second makes the bulk query, which includes a callback to the formula execution endpoint of the next formula. 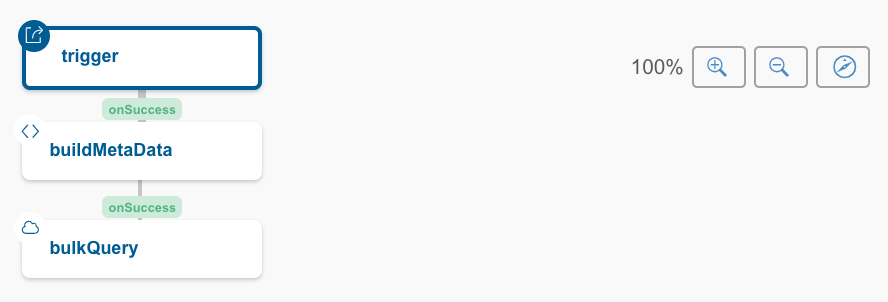
Formula 2
To create a formula that receives the notification that the job completes, downloads the file from the original connector, and posts to the destination:
Build a formula template and select Manual as the trigger, and then click Save.
Note: You do not need to configure anything for the manual trigger, but take note of the endpoint that you will need to trigger the formula:POST /formulas/instances/:id/executionsAdd two connector instance variables to represent the connector that you are downloading from and the connector that you are uploading to, and a variable to represent the resource that you are syncing.
- Click Variables.
- Click Value.
- Enter a name for the variable that represents the resource that you want to sync. For this tutorial we'll call it
resourceName. - Click Save.
- Create Connector Instance variables to represent the source and target systems to sync. For this example, use
originInstanceanddestinationInstance.
- Click Variables.
In the formula visualization, click
to add a step.- Create a JS Filter step that makes sure that the bulk query is completed.
- Click JS Filter (true/false).
- Enter a name for the script. We'll call it
isSuccessful. - Enter a script such as the example below.
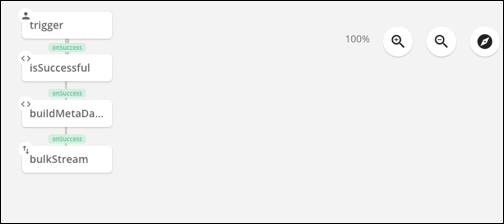
    let status = trigger.args.status;

  if (status && status === "COMPLETED") {
    done(true);
  } else {
    done(false);
  }
Create a JS Script step that defines an identifier field, which is the unique key for an upsert operation. It also specifies the content type as csv. Click the isSuccessful step, and then click Add OnSuccess .
- Click JS Script.
- Enter a name for the script. We'll call it
buildMetaData. - Enter a script like the following example:
  const metaData = {
    "identifierFieldName":"email"
  }

  const downloadHeaders = {
    "Accept":"text/csv"
  };

  done({
    "metaData": metaData,
    "downloadHeaders": downloadHeaders
  });
Create a Connector Stream step to move the files downloaded from the origin instance to the destination instance. Click the buildMetaData step, and then click Add OnSuccess .
- Select Stream File.
- Enter a name. For this example we'll call it
bulkStream. - In Download Connector Instance Variable, click , and then select the originInstance variable that we created earlier.
- In Download Method, enter
GET. - In Download API, enter
/bulk/${trigger.args.id}/${config.resourceName}.${trigger.args.id}gets the id from the payload sent to the trigger by Formula 1.${config.resourceName}refers to the resourceName variable that identifies the resource that you want to sync. - In Upload Connector Instance Variable, click , and then select the destinationInstance variable that we created earlier.
- In Upload Method, enter
POST. - In Upload API, enter
/bulk/${config.resourceName}.${trigger.args.id}. - Click Show Advanced.
- In Download Headers, enter the reference to the download headers that you built in the script in the
buildMetaDatastep. In this case, type${steps.buildMetaData.downloadHeaders}. - In Upload Query, enter the reference to the upload query that you built in the script in the
buildMetaDatastep. In this case, type${steps.buildMetaData.metaData}. - Click Save.
The second formula should look like the visualization below.