Prerequisites
When configuring your SAP Open Connectors account to use single sign-on (SSO), there are a few things you need to know:
- If your SAP Open Connectors account was created prior to January 2017, it may not have a customer id by default; this can result in an error if you try to add members after setting up SSO. If this is the case, please talk to your account manager prior to getting started.
- You will need your SSO provider's SAML metadata.
Configuring SSO in SAP Open Connectors
Please note that code references provided in this article are just examples; your metadata might be structured slightly differently.
- Select the Security tab on the left-side toolbar, and then select Identity.
- Select Application Identity Provider, and then click Add Trusted Identity Provider.
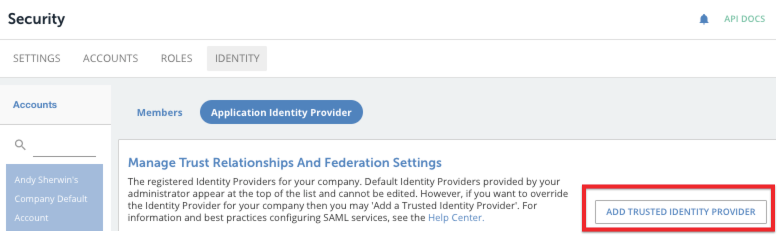
The Trusted Identity Provider configuration page appears. - In the Level field, select the SAP Open Connectors level at which you want this trusted SSO to exist. The options are
organizationandaccount. This is the only real SAP Open Connectors-specific information you will need to provide; the rest of the configuration information is based on the identity provider. - In the Entity ID field, enter the entity ID. In the metadata, this should appear in a field related to the Entity Descriptor; for example:
<EntityDescriptor entityID="http://localhost:5555/auth/realms/parent"> - In the Description field, enter a unique way to identify the entity provider.
- In the SSO URL field, insert the redirect URL. In the metadata, this should appear in a field related to single sign-on; for example:
<SingleSignOnService Binding="urn:oasis:names:tc:SAML:2.0:bindings:HTTP-Redirect" Location="http://localhost:5555/auth/realms/parent/protocol/saml"/>
- In the Name ID Format field, select the appropriate option; we recommend selecting
persistent. - In the optional Logout URL field, enter the redirect URL. In the metadata, this should appear in a field related to logout; for example:
<SingleLogoutService Binding="urn:oasis:names:tc:SAML:2.0:bindings:HTTP-Redirect" Location="http://localhost:5555/auth/realms/parent/protocol/saml"/> - If you enter a value for the Logout URL, you should also enter a value for the Logout Redirect URL. This URL is where users will be redirected after they are logged out.
- In the Signing Certificate field, enter the certificate's content. In the metadata, this should appear in a field with a name similar to "x509 certificate"; for example:
<dsig:X509Certificate>

MIICmzCCAYMCBgFujBpE7jANBgkqhkiG9w0BAQsFADARMQ8wDQYDVQQDDAZtYXN0ZXIwHhcNMTkxMTIxMDM1NDIyOcyFPM2Ed4vWRw5bug6cDZlHMcQpbKMTeVV/m2zotETaoZGDZFt3txe3H5M9NqHplf7GivOXfc1Bd4wA3azDshpvnWCMAwCIxiCOEF6flTY38f7Hl82Ryeutc9hKJ/6+96AzjO0P9uULngQ4GThtClGPia0ui+S0k+ot0dzojXu2HY1raUIvgi8xg45f0MTnMreUf9Shwlak/iUDw++7Nhg3sAeZsdfsdfsdfcoz4LB2kryaXEX16B+PMQgCRqebtoGHnSBAgMBAAEwDQYJKoZIhvcNAQELBQADggEBAJ7Cna0zgXYbA5iXJpOVBDsuJPauLi7yMOxUP7OMwwfB2+14tvIC50Yxhw96/AM6gkbZCXCSvlEFDucpVv3w8onL8oW+gVxobN7J6vScELXz3sGFfSDq9Z0iVKjXbsWIqFfkMQ1kOxUqoU8+xoYAqpp0Fudo71YnwrNafIwkMAJfsxf4meAbX9MuhVv/1/Yo/4H9sYE9IqM0TAPPtnvNDokNBm0huJ+F0BP6ahkaOWhKQ83SlFN7IuQuihPdl4uPCubpAj1l/8JUNUquNAbmpmCFTXX3VZw6pYAFEPyqKkegZnNO1H8tHj/akMFLrJhuLYgehQfRYSXe5RN6IfhaLnI=

</dsig:X509Certificate>
- From the Signature Algorithm menu, select the algorithm to use in the signing process.
- Click Save.
The Manage Trust Relationships and Federation Settings page appears, listing the available trusted providers. - Click the download button for your provider to generate and download the provider XML file.
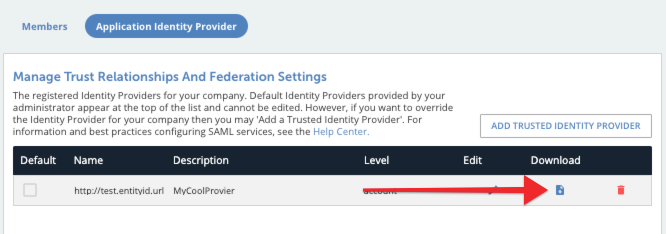
- Upload the provider XML file to the SSO provider's side in order to establish the connection.
- Add members who will sign in using SSO. Do this on the Members page of the Identity tab.
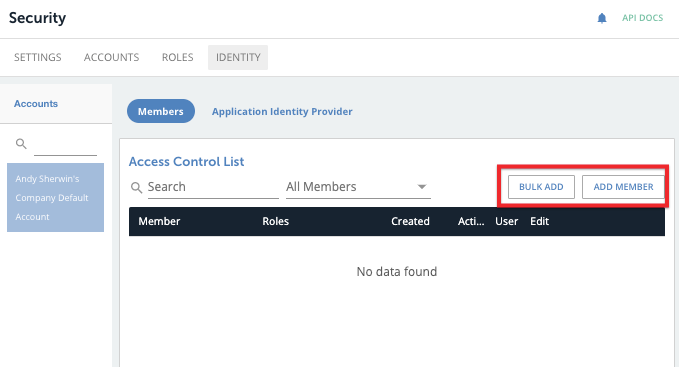 Note: as a best practice, name the list of members with the corresponding external ID from the service provider's system.
 - After completing these steps, the user should be able to sign in using SSO.


 Note: as a best practice,
 Currently, SAP Open Connectors does not have a way to force SSO sign-in, but we may develop it in the future.
