Transformations refer to the conversion of the fields in an API provider's resource to match the fields in a common resource. Transformations are the result of the process of creating a common resource, and then mapping fields in an connector instance resources to the common resource. See Creating Common Resources for the steps to set up resources for transformation.
Map Fields to a Common Resource
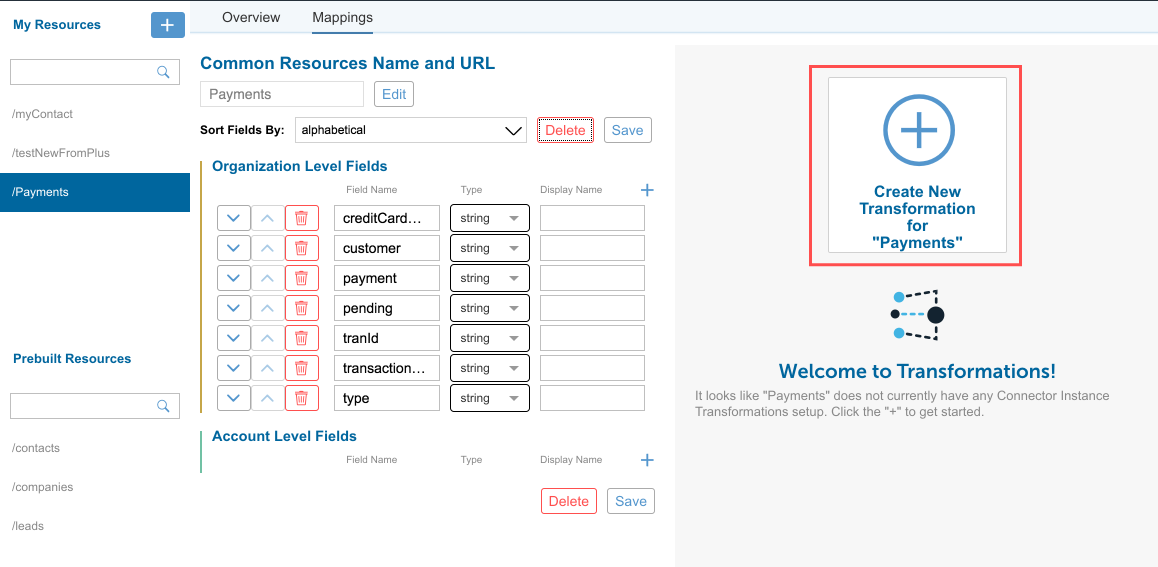
Before you can transform fields, you need to map the fields for each connector instance to a common resource. The common resource fields are on the left and the connector instance resource fields are on the right.
id field, which you can choose to map to an id field in the connector's resource, delete, or rename to an entirely different field. If you cloned your resource, you will see more fields than just the id field.You can map fields one at a time, or you can add several fields to the common resource at once, and then map them later. These instructions describe mapping a single field at a time.
This section describes mapping to a common resource at the account level using the UI. You must be an account level user to map to account level fields. Go here for instructions about using the APIs.
To map fields:
- Navigate to the Transformations page.
- On the Transformations page, click Create New Transformation.
- Select the Connector Instance, and then select the Connector Instance Resource.
The Resources available to that Connector Instance appear in the Connector Instance Resources column after you select a resource.
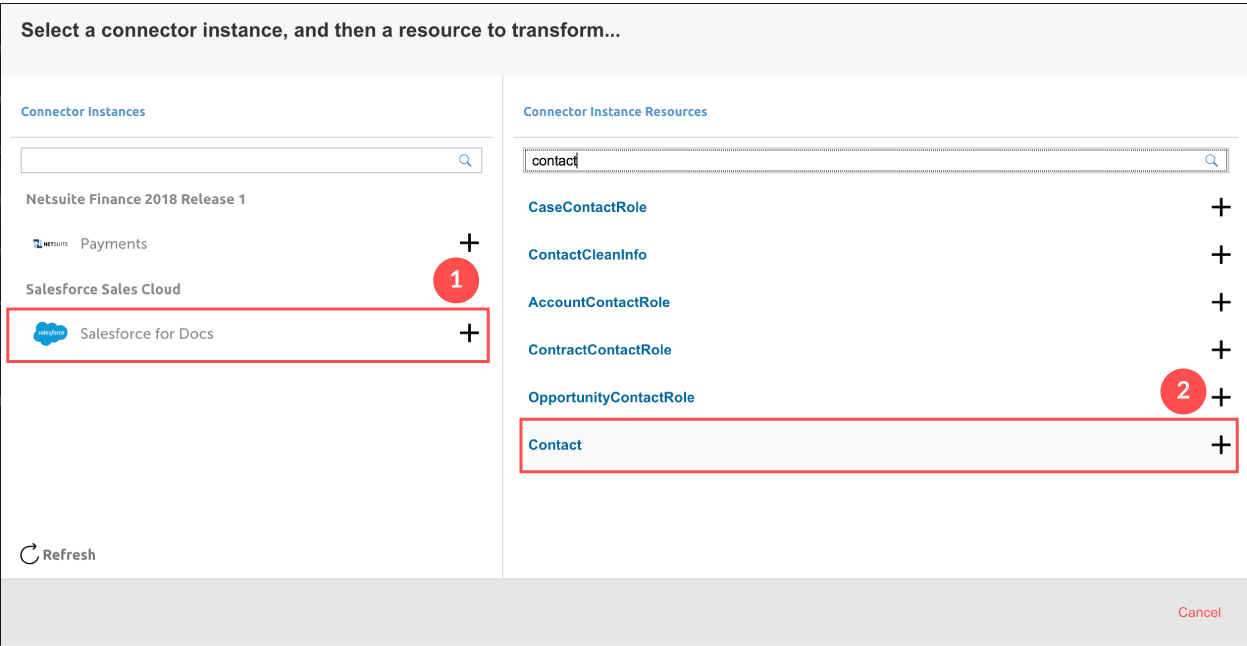 Tip: Use the search fields to find what you are looking for in long lists.
 - Beginning with the default field id, select a field on the right to map to id.Note: If you do not see the fields that you expect, switch on Load metadata by id, and use the id of an actual object in the resource. We'll then use the metadata associated with that object to populate the list of fields. See Transforming Custom Objects for details.
- Click
 next to the Account Level Fields to add another field.Note: You can add fields at the instance level as well, but these steps focus on creating an account level common resource.
 - Enter a name for the field, and then choose the data type if the field is something other than a string.
- Optionally add a Display Name to more clearly identify a field with how it appears in an API provider's UI.
- Select the corresponding field on the right to map to the new field.Note: You can type in the field to filter.
- Continue adding resources until you finish, and then click Save.
- To map the resource to another instance, click Transformations in the breadcrumbs at the top of the page.


Tips
If a common resource has account-level fields overridden by instance-level fields, the instance-level overrides will appear in the Account Level Fields list, although they apply only to the specific instance they're mapped to.
After you add an instance level field and click Save, the new instance level field will also appear in the above Account Level Fields list, mirroring what you just added in Instance Level Fields. The new instance level field's place in the Account Level Fields section indicates that it is applied in the particular instance, as the instance level overrides a corresponding account-level field.
- If you made a mistake and don't want to include a field in a common resource, click
 . If you still want the field but want to remove the mapping, click
  .
. - If you need to map a custom field, click
 , and then type a name. See Transforming Custom Objects for details.
 - We use dot notation to show sub-objects in the connector instance resources. If you need to create sub-objects in your common resource, use dot notation. Examples include address.city, address.state, and address.street. See Working With Nested Objects for details.
- Use Javascript to Manage Complex Objects. See Javascript in Transformations for details.
 . If you still want the field but want to remove the mapping, click
  .
. , and then type a name. See
 Map and Transform Fields with the APIs
Map Fields to Create a Default Transformation
You can use several APIs to map resources depending on the level at which you want to map them. This section describes mapping fields for an account-level default transformation. The result is a default transformation for all instances of a specific connector.
To map fields:
Construct a JSON body as shown below. For descriptions of each parameter, see Transformation JSON Parameters.
{ "level":"account", "vendorName":"<VENDOR_RESOURCE>", "fields":[ { "path":"<VDR_FIELD>", "type":"<VDR_TYPE>", "vendorPath":"<VENDOR_FIELD>", "vendorType":"<VENDOR_TYPE>" } ] }- Call the following, including the JSON body from the previous step:
POST /accounts/elements/{keyOrId}/transformations/{objectName}Note: Replace {keyOrId} with the connector key or id and replace {objectName} with the name of the common resource.
Transformation JSON Parameters
| Parameter | Description | Required (Y/N) |
|---|---|---|
| level | The access level of the transformation, either account or instance. | N. Default depends on endpoint. |
| vendorName | The name of the resource that contains the fields that you want to map to the common resource. | N |
| fields | An object containing the field names and data types of the common resource and the vendor resource. Tip: To get a list of fields in a resource, call GET hubs/{hub}/objects/{RESOURCE}/metadata. | N |
| path | The name of the field in the common resource. | Y |
| vendorPath | The name of the field in the vendor resource. | Y |
| type | The data type of the field in the common resource. Data types can be boolean, string, date, and number. | N |
| vendorType | The data type of the field at the vendor. Unless the format is date, you do not need to include this parameter. If the format is date, also include a mask. | N |
cURL Example
curl -X POST \
  https://api.openconnectors.us2.ext.hana.ondemand.com/elements/api-v2/accounts/elements/sfdc/transformations/myContacts \
  -H 'authorization: User sAfK7LJGNz5ZHcNrvdJvLI=f03WbTbH6aRKc0HJ3oOIi, Organization 58168435e3b9959a929eb04b6218b9a2' \
  -H 'content-type: application/json' \
  -d '
  {
  "level":"account",
  "vendorName":"Contact",
  "fields":[
    {
      "type":"string",
      "path":"FirstName",
      "vendorPath":"FirstName"
    },
    {
      "type":"string",
      "path":"id",
      "vendorPath":"Id"
    },
    {
      "type":"string",
      "path":"LastName",
      "vendorPath":"LastName"
    },
    {
      "type":"date",
      "path":"birthdate",
      "vendorPath":"Birthdate",
      "vendorType":"date",
      "configuration":[

      ]
    }
  ]
}'
Map Fields at the Instance Level
Using the /instances endpoint, you can map fields at the instance level. Mapping fields is a two-step process that includes creating an instance level resource, and then mapping fields to it.
To create an instance level common resource and map fields to it:
Construct a JSON body for the instance level resource as shown below (see New Common Resource JSON Parameters):
{ "fields": [ { "type": "<dataType>", "path": "<fieldName>" } ] }- Create the common resource. Make the following API call with the JSON body from the previous step, replacing
{id}with the instance id, and replacing{objectName}with the name of the common resource:POST /instances/{id}/objects/{objectName}/definitions - Construct a JSON body to map fields to the new common resource as shown below. For descriptions of each parameter, see Transformation JSON Parameters.
{ "level":"instance", "vendorName":"<VENDOR_RESOURCE>", "fields":[ { "path":"<VDR_FIELD>", "type":"<VDR_TYPE>", "vendorPath":"<VENDOR_FIELD>", "vendorType":"<VENDOR_TYPE>" } ] } - Map fields to the common resource. Call the following, including the JSON body from the previous step:
POST /instances/{id}/transformations/{objectName}Note: Replace{id}with the instance id and replace{objectName}with the name of the common resource.
cURL Example
Step 1: Create the common resource
curl -X POST \
  https://api.openconnectors.us2.ext.hana.ondemand.com/elements/api-v2/instances/{id}/objects/{objectName}/definitions \
  -H 'authorization: User sAfK7LJGNz5ZHcNrvdJvLI=f03WbTbH6aRKc0HJ3oOIi, Organization 58168435e3b9959a929eb04b6218b9a2' \
  -H 'content-type: application/json' \
  -d '
  {
    "fields": [
      {
        "type": "string",
        "path": "title"
      }
    ]
  }'
Step 2: Map fields to the common resource
curl -X POST \
  https://api.openconnectors.us2.ext.hana.ondemand.com/elements/api-v2/instances/{id}/transformations/{objectName} \
  -H 'authorization: User sAfK7LJGNz5ZHcNrvdJvLI=f03WbTbH6aRKc0HJ3oOIi, Organization 58168435e3b9959a929eb04b6218b9a2' \
  -H 'content-type: application/json' \
  -d '
  {
    "vendorName": "Contact",
    "level": "instance",
    "fields": [
      {
        "path": "title",
        "type":"string",
        "vendorPath": "Title"
      }
    ]
  }'
Map Fields at the Account Level
Using the /accounts endpoint, you can map fields at the account level. Mapping fields is a two-step process that includes creating an account level resource, and then mapping fields to it.
To create an account level common resource and map fields to it:
- Construct a JSON body for the account level common resource as shown below (see New Common Resource JSON Parameters):
{ "fields":[ { "type":"<dataType>", "path":"<fieldName>" } ] } - Create the common resource. Make one of the following API calls with the JSON body from the previous step, replacing
{id}with the account id, and replacing{objectName}with the name of the common resource:POST /accounts/objects/{objectName}/definitionsNote: Use this API call to create a common resource at the default account level.POST /accounts/{id}/objects/{objectName}/definitionsNote: Use this API call to specify an account by id. Construct a JSON body to map fields to the new common resource as shown below. For descriptions of each parameter, see Transformation JSON Parameters.
{ "level":"instance", "vendorName":"<VENDOR_RESOURCE>", "fields":[ { "path":"<VDR_FIELD>", "type":"<VDR_TYPE>", "vendorPath":"<VENDOR_FIELD>", "vendorType":"<VENDOR_TYPE>" } ] }- Map fields to the common resource. Call the following, including the JSON body from the previous step:
POST /accounts/{id}/elements/{keyOrId}/transformations/{objectName}Note: Replace{id}with the instance id, replace{keyOrId}with the connector key or id, and replace{objectName}with the name of the common resource.
cURL Example
Step 1: Create the common resource (default account)
curl -X POST \
  https://api.openconnectors.us2.ext.hana.ondemand.com/elements/api-v2/accounts/objects/{objectName}/definitions \
  -H 'authorization: User sAfK7LJGNz5ZHcNrvdJvLI=f03WbTbH6aRKc0HJ3oOIi, Organization 58168435e3b9959a929eb04b6218b9a2' \
  -H 'content-type: application/json' \
  -d '
  {
    "fields": [
      {
        "type": "string",
        "path": "title"
      }
    ]
  }'
Step 1: Create the common resource (specific account)
curl -X POST \
  https://api.openconnectors.us2.ext.hana.ondemand.com/elements/api-v2/api-v2/accounts/{id}/objects/{objectName}/definitions \
  -H 'authorization: User sAfK7LJGNz5ZHcNrvdJvLI=f03WbTbH6aRKc0HJ3oOIi, Organization 58168435e3b9959a929eb04b6218b9a2' \
  -H 'content-type: application/json' \
  -d '
  {
    "fields": [
      {
        "type": "string",
        "path": "title"
      }
    ]
  }'
Step 2: Map fields to the common resource
curl -X POST \
  https://api.openconnectors.us2.ext.hana.ondemand.com/elements/api-v2/accounts/{id}/elements/{keyOrIdtransformations}/{objectName} \
  -H 'authorization: User sAfK7LJGNz5ZHcNrvdJvLI=f03WbTbH6aRKc0HJ3oOIi, Organization 58168435e3b9959a929eb04b6218b9a2' \
  -H 'content-type: application/json' \
  -d '{
    "vendorName": "Contact",
    "level": "account",
    "fields": [
      {
        "path": "title",
        "type":"string",
        "vendorPath": "Title"
      }

  }'
Javascript in Transformations
You can use custom Javascript when the basic object mapping does not meet your needs. For example, you might need to break a single address object into its component parts (address.city, address.state, address.street, and address.zip).
- For all scripts, Javascript `strict` mode is enforced.
- ES6 is supported.
- The function parameters are immutable, meaning they cannot be assigned to directly. To change an object or value passed into the function, first copy it to your own local variable, and then make the necessary changes.
To access the custom Javascript functionality:
- Click
 .
.
 .
.functions include the parameters and functions in the following table:
Common Resource Custom JS Parameters and Functions
| Parameter | Description |
|---|---|
| transformedObject | The transformed object, with any mappings already taking place. |
| originalObject | The original object, with no transformations or mappings taking place on it. |
| fromVendor | Is the transformation being executed coming back from the vendor (on an API response) ? |
| done | The callback function needed to call at the end of your JS. Call done to terminate a given step. |
Libraries
- CE: Our custom library that provides some common functionality. It is not necessary to
requirethis library, it is available by default.CE.randomString(): Generate a random string (approx. 10 characters long).CE.randomEmail(): Generate a random email address.CE.md5(str): Create an MD5 hash from a string value. Takes astringas a parameter. Returns astring.CE.b64(str): Encode a string in base64. Takes astringas a parameter. Returns astring.CE.decode64(str): Decode a string from base64, using UTF-8 encoding. Takes astringas a parameter. Returns astring.CE.hmac(algo)(enc)(secret, str): HMAC hash a string (str) using the provided secret (secret), algorithm (algo), and encoding (enc). See https://nodejs.org/api/crypto.html#crypto_class_hmac for more information about the algorithm and encoding parameters.CE.hmac[algo][enc](secret, str): This is a set of convenience functions that allow HMAC hashing using some common algorithms and encodings. For example,CE.hmacSha1Hex(secret, str)will create an HMAC SHA1 hash of the provided string, using the provided secret, and return a hex string. You can replace algo and enc with the following values: algo:Sha1,Sha256,Md5enc:Hex,base64
- Lodash: The popular
lodashlibrary. To use this library, simplyrequireit in your script. It is possible to use the library modules, as well, such aslodash/fp. - Util: The standard Node
utillibrary. To use,requireit in your script.
Node global URL Origin is supported, the module is not maintained by the platform.Examples
Adding fields to a resource when a certain endpoint does not provide them:
function (originalObject, transformedObject, fromVendor, done) {
transformedObject.isCreatedThisYear = (fromVendor && transformedObject.createdDt > '2016-01-01');
done(transformedObject);
}
Two endpoints identify priority differently: one users numbers (1 or 2) and the other descriptions (low or high).
function (originalObject, transformedObject, fromVendor, done) {
if (!fromVendor) done(transformedObject); // only care when returning data from the vendor

transformedObject.priority = transformedObject.priorityNumber === 1 ? 'low' : 'high'; // we prefer our priority to be the string representation, so we convert the endpoints "priorityNumber" field to the appropriate string representation here.

done(transformedObject);
}
Combining FirstName and LastName fields.
function (originalObject, transformedObject, fromVendor, done) {
if transformedObject.Name = originalObject.FirstName + '  ' + originalObject.LastName;
done(transformedObject);
}
Transforming Custom Objects
If you do not see an object that you expect in the instance resources you can either use an id of an actual object to load its metadata or manually enter the object name. This sometime happens for custom objects you created at the endpoint.
To load object metadata:
- Switch on Load metadata by id.
- Enter an actual id associated with an object in the resource.
- Click Load.
We'll use the metadata associated with that object to populate the list of fields.
To manually map a custom object:
Click
next to the field.The list becomes a text entry field.
Enter the name of the object.


Removing Fields During Transformation
We pass through all fields in the JSON on both requests and responses. However, you can choose to remove all unmapped fields or specific fields from requests or responses.
To remove unmapped fields:
- On the Transformations page, click
 next to your connector instance.
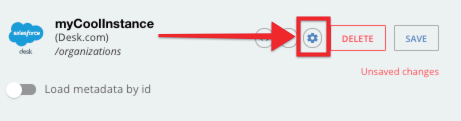
- Switch Remove Unmapped Fields to on.
- Click Save.
 next to your connector instance.
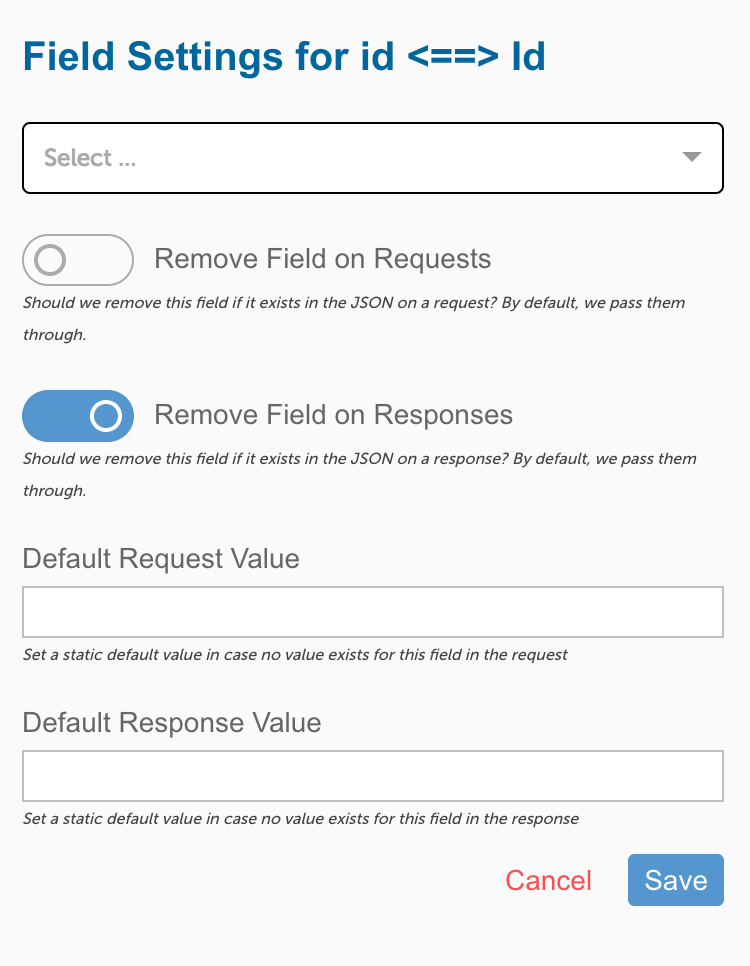
To remove fields from requests or responses:
- On the Transformations page, click next to the field.

Switch on or off the sliders for the requests or responses.
For example, in the following configuration, we remove the data.id field from the response.


Transforming Data Types
You can transform the data types on vendor objects. In most cases, you only need to select a new data type, but for dates you also provide a mask, or date format.
To change data types:
- On the Transformations page, click next to the field.
- Select a type from the list.
- If you select date, add a date format to the Date Mask.

Setting Default Values
If no values exist for a specific field, but you do not want to remove it, you can set a default value on both the response and request.
To set a default value:
- On the Transformations page, click next to the field.
- Click Default Request Value or Default Response Value, and then type the value.
- Click Save.
Testing Your Transformations
After you set up your mapping, you can test your transformations.
To test a transformation:
- On the Transformations page, click
 .
. - Enter required information such as the object's Id.
- Review the transformed response body. This is the response containing only the fields in your common resource.
- Click Original to see the entire response JSON payload.
- Test a Put or Patch by selecting the appropriate method, and then entering the JSON request.Tip: Copy the JSON payload from Transformed.
Click Run.
 .
.Adding Your Common Resource to the API Docs
You can add the common resource you create to the instances of each affected connector.
To add a common resource to API docs:
- On the Transformations page, click next to your connector instance.
- Switch Add to API Docs on.
- Click Save.
To confirm that the common resource is added to your API docs:
- Go to an connector instance.
- Hover over the instance card, and the click API Docs.
- Scroll to your common resource.
Working with Nested Objects
We display sub-objects in dot notation. You can also use dot notation to nest objects in your common resource. For example, you might want to create nested address fields like those shown in the example below:
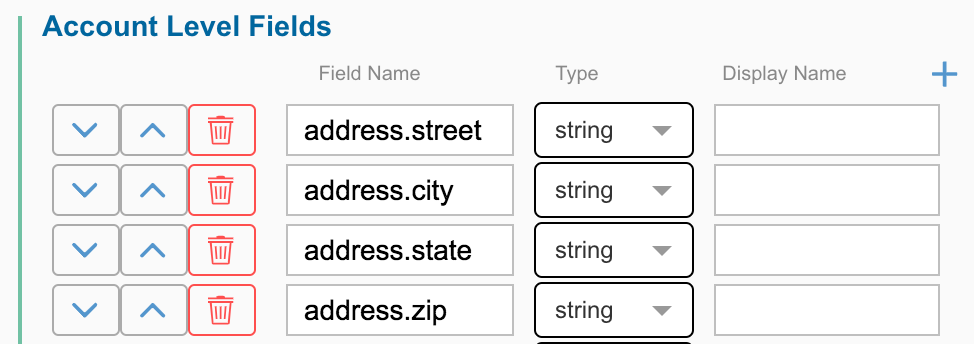
The JSON result of this nested object:
{
  "Address":{
    "city":"Cambridge",
    "state":"MA",
    "street":"1234567 Elm St",
    "zip":"99999"
  }
}
Map Complex Objects
You can use regular expressions as values for the JSON body parameters.
Examples:
Get the value of the name field from the Products array where id = 4.
{
  "fields": [
    {
      "path": "AppleIpadName",
      "vendorPath": "Products[id=4].name"
    }
  ]
}
Get the value of the name field from the Products array where id = 2.
{
  "fields": [
    {
      "path": "AppleNewProductName",
      "vendorPath": "details.Products[?(@.id==2)].name"
    }
  ]
}
Get the touchId value from the Products array with id=2 which is inside the features object.
{
  "fields": [
    {
      "path": "AppleTouchProductId",
      "vendorPath": "Products[?(@.features.touchId==true)].id"
    }
  ]
}
Get the Id value of the Products array at index 0.
{
  "fields": [
    {
      "path": "AppleProductId",
      "vendorPath": "Products[0].id"
    }
  ]
}
Get a count of the Products array.
{
  "fields": [
    {
      "path": "AppleProductsCount",
      "vendorPath": "Products[*].size()"
    }
  ]
}
Using the OCNQL Query Override Field
SAP Open Connectors provides a query override field for any connectors whose native search specifications are different from the standard fields implemented on the resource in SAP Open Connectors. For example, if you are using the Hubspot Marketing connector and want to search for a customer's email, you would query on person.email, as opposed to simply "email," a more commonly used field. This means that when mapping Hubspot Marketing fields in a transformation, you must override the EMAIL field with PERSON.EMAIL in order to successfully use the search; otherwise, you will receive an invalid expression type error.
If the Query Field Name is left blank, the mapped field value will be used.
To use the query override field with a common resource, complete these steps:
- Log in to SAP Open Connectors and click Common Resources.
- On the My Resources tab, hover over the common resource and click Mappings.
- On the Mappings tab, find the field whose name you want to override and click the Field Settings button.
- On the Field Settings drawer, enter the overriding value to query at the endpoint in the Query Field Name field, and then click Save.
- To test the query override, click the Try It Out button.
Known Connectors
All connectors support the OCNQL query override field. However, some connectors may need to use it more frequently than others based on the naming of their fields. See the connector's documentation for additional information.
