In this article, you'll learn how to create bulk download and upload jobs using SAP Open Connectors's APIs. All bulk APIs are available for catalog connectors, and most bulk APIs are available for custom-built or Community connectors. If you need to use the POST bulk/download API for a custom or Community connector, you must do so outside of the SAP Open Connectors UI; see our bulk services Postman collection for more information.
Performing a Bulk Download via API
Use bulk download to generate a csv or json file from a large number of records. Since the bulk download works asynchronously, you need to make two calls to download a file.
Step 1: Create a Bulk Job
SAP Open Connectors currently supports two bulk download APIs:
POST /bulk/query(for all available fields, see the Job Criteria for /bulk/query)POST/bulk/download (for all available fields, see the Job Criteria for /bulk/download)
bulk/download API whenever possible. The only time SAP Open Connectors recommends using bulk/query is when the vendor endpoint supports native bulk.Both of the above APIs create a bulk job, which builds out a file in SAP Open Connectors. The bulk/query uses a OCNQL query to specify the records included in the file (used for native bulk support), while bulk/download uses a payload with more customization and functionality.
You will need the bulk job's ID from the response body in order to check the status of your bulk job and to download the resulting file once it's complete. The following is an example response body for the creation of a bulk job:
{
  "instanceId": 425904,
  "id": "42114492",
  "status": "CREATED"
}
Since the job itself will take an unknown amount of time to complete, you can add a callback URL to the bulk job for both APIs. Once completed, the job makes a callback to the URL and notifies you of its completion.
Example POST bulk/query – cUrl and UI
curl --location
--request POST 'https://staging.cloud-elements.com/elements/api-v2/bulk/query?q=select%20*%20from%20payments%20limit%20100' \
--header 'accept: application/json' \
--header 'Authorization: User jiIDhi88eO2sf7eEfjJIeope9279dA38AJjeiOp124vg14o=, Organization 47902sge72126dfsuIEA124dffhHQdc4, Element fu9U492udsetrptT9CvUfeyiOIieWjq4Uxwmmi4k=' \
--header 'Elements-Async-Callback-Url: https://exampleNotificationURL.com'

Example POST bulk/download Payload
{
  "objectName": "MyContact",
  "format": "application/json",
  "selectFields": "application/json",
  "limit": 100,
  "apiLimit": 100,
  "filterNulls": true,
  "from": "2018-09-18T10:56:14.000+0000",
  "to": "2020-11-30T10:56:14.000+0000",
  "filterDateField":"lastModifiedDate",
  "notificationUrl": "https://www.examplenotificationurl.com",
  "where": "lastName='Smith'",
  "query": {
    "includeDeleted": true,
  },
  "pageSize": 5,
  "continueFromJobId": 123456,
}
Step 2: Download the Bulk File
To download the results of your bulk job, use the GET /bulk/{id}/{objectName} API. you'll use this same API to retrieve jobs submitted using either POST /bulk/query or POST /bulk/download.
After the job generated from the /bulk/query or /bulk/download call completes, use the GET /bulk/{id}/{objectName} API to download the file. {id} refers to the ID of the bulk job you captured above in step 1, and {objectName} refers to the object name you used to generate the bulk job, eg contacts, accounts, myVDR, etc.
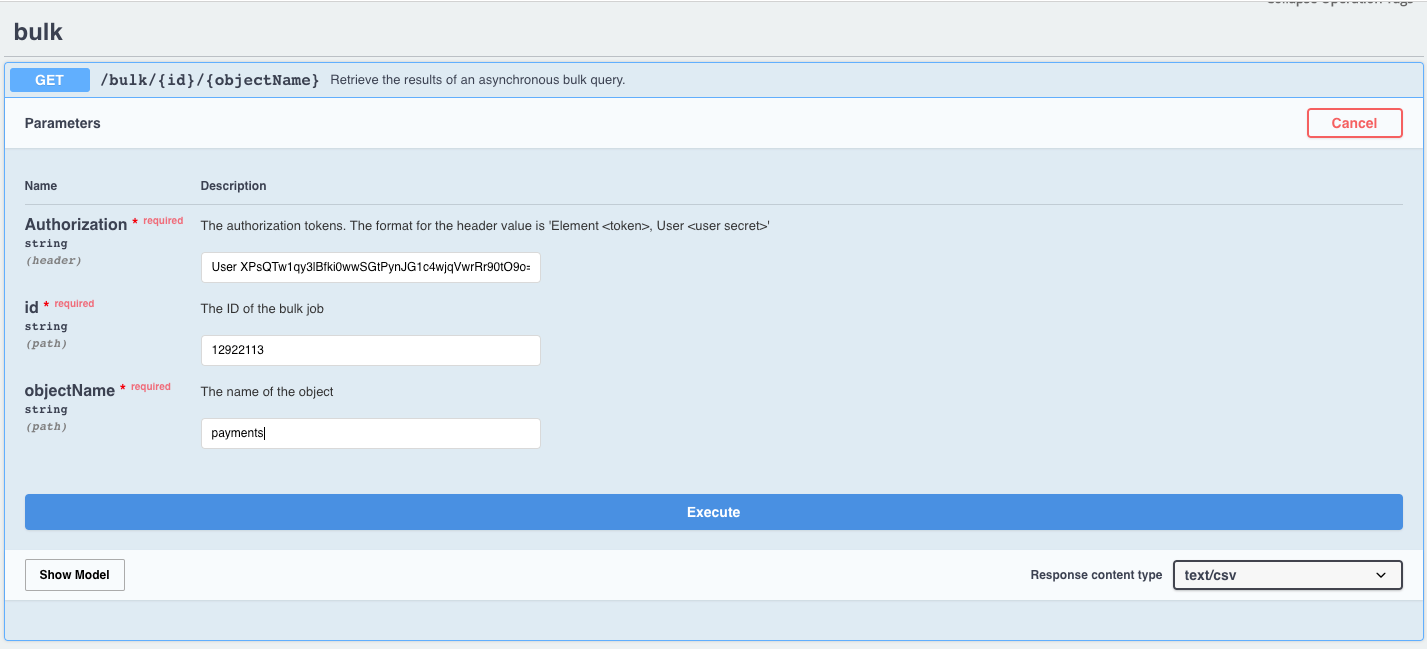
/bulk/query API, the file can be downloaded as a csv or json when you execute the request. For jobs created with the bulk/download API, the file must be downloaded in the format you specified in the payload when you created the bulk job. You must choose the Response Content Type that you specified in the bulk/download payload or you will receive a Bad Request error message.
Performing a Bulk Upload via API
Unlike bulk download, a bulk upload job only requires one call: POST /bulk/{objectName} (for all available fields, see the Job Criteria for /bulk/query)
Example POST /bulk/{objectName} (upload) - cUrl
curl --location
--request POST 'https://staging.cloud-elements.com/elements/api-v2/bulk/payments' \
--header 'accept: application/json' \
--header 'Authorization: User jiIDhi88eO2sf7eEfjJIeope9279dA38AJjeiOp124vg14o=, Organization 47902sge72126dfsuIEA124dffhHQdc4, Element fu9U492udsetrptT9CvUfeyiOIieWjq4Uxwmmi4k=' \
--header 'Content-Type: multipart/form-data' \
--form 'file=@12924282.json;type=application/json'
For connectors that support upsert, identifierFieldName is passed in the metaData to designate the field to be used for upserts.
.JSON and not in .CSV as the nested fields may not appear in the CSV format.Bulk Services Postman Collection
Currently, the following bulk APIs are not available in the UI (itself not available to all users):
POST /bulk/downloadfor Community and custom connectorsGET /bulk/{id}/{objectName}/datafor all connectorsPUT /bulk/{id}/previewfor all connectors
However, these APIs are available via our bulk Postman collection. This collection contains all of the bulk APIs listed above, whether or not they are available in the UI. Please refer to the Available Bulk APIs table in our documentation, or review the descriptions in the collection for more detailed information.
To import the collection into Postman, click the Import button, select Raw Text, paste the raw JSON from the collection file, and click Continue.
After importing the collection, you will also need to save an environment or environments that include the following:
- A base url parameter (baseUrl)
- In staging, set baseUrl to https://staging.cloud-elements.com/elements/api-v2
- In production, set baseUrl to https://api.cloud-elements.com/elements/api-v2
- An authorization header parameter (authHeader)
- Your authHeader should be formatted as follows (this example is specific to your environment, so double-check if you receive any errors): User {YourUseSecretHere}, Organization {YourOrgSecretHere}
To set an environment in Postman, click the icon to the right of the eye icon.
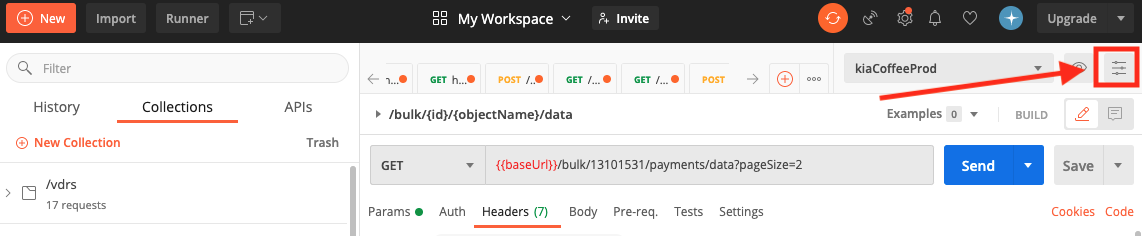
Click Add, then fill out the following page accordingly, where the gray block stands in for your user secret:

When you are ready to make a call, you will need to add the connector instance token of the connector instance you’d like to make the call with to your Authorization header, as follows:
{{authHeader}}, Element {InsertYourInstanceTokenHere}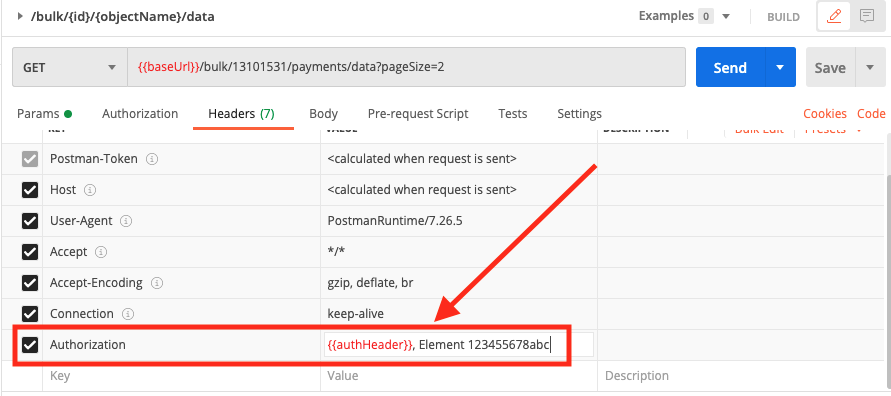
After completing the above, you're ready to make a call to one of the bulk service APIs.
Example cUrl for GET /bulk/id/objectName
curl --location --request GET 'https://staging.cloud-elements.com/elements/api-v2/bulk/13101531/payments' \
--header 'Authorization: User 123456789abc, Organization abcdef123456, Element xyz123456789' \
--header 'Accept: application/json'
Best Practices for Bulk Queries
Bulk queries are a powerful tool to retrieve records in greater numbers than possible when using standard SAP Open Connectors endpoints. Because of their potential to return large amounts of records, they can often take a long time to complete, making it even more important to utilize best practices when performing queries and fetching their results. Here are a few best practices:
Use the Where Clause
Make sure you are crafting your bulk queries to return only the records you are interested in seeing. For instance, instead of using the query select * from contacts, use select * from contacts where lastModifiedDate > '2018-05-01' to return only those records that were modified after May 1st, 2018. For more information on how to use the where clause, see Querying with OCNQL.
Retrieve Only the Columns You Need
Many connectors support field selection. In your query, you can list only the columns that you want returned to improve the speed of the bulk job. Fore example, instead of select * from contacts, use select firstName, lastName from contacts where ... to only return the firstName and lastName fields of your contacts. This also minimizes the size of your bulk results file which decreases the time needed to fetch your results. Another way to achieve this is to use a common resource with only the fields mapped that you care about.
Use a Limit Statement
You can easily limit the number of results returned by your query by adding a limit statement. For example, select * from contacts limit 500. This retrieves only the first 500 records returned by the API provider, greatly reducing the time needed for the bulk job to complete if the unlimited query would return many more than 500 records.
Set a Callback URL
When creating a bulk query, you can provide a value for the header Elements-Async-Callback-Url to receive a notification upon the bulk job's completion. The notification also sends information about the bulk job, such as whether the bulk job was successful and the number of records returned. Incorporating this callback URL functionality into your app allows your app to process bulk job results as soon as they are done as well as handle any errors.
