This article describes the process for doing Two-Way SSL in Connector Builder. Two-Way SSL is also sometimes referred to as SSL, Mutual TLS/SSL, Two-Way TLS, or TLS v1.2.
Not sure what that is? If your API says you need to send a signed certificate for each request, there is a chance this article will help.
For this example, I will be building authentication for ADP WorkforceNow and making a GET request following these steps:
- Create a Java KeyStore formatted certificate.
- Configure the connector to accept our certificate, and finish authentication.
- Create an instance.
- Validate with a GET call.
At a more granular level:
- Gather files needed create a keystore. I have a
.pemfile and a.keyfile, but you may instead/also have a.cerfile. - Convert the
.pemfile to a.P12(pks12) file - Create the Java KeyStore from the
.P12(pks12) file. - Base64 encode the Java KeyStore (.jks) file.
- Create an connector with custom authentication
- Add a custom resource and set "API Type" to "On Provision"
- Exchange the Basic Auth token with the Bearer token
- make a GET Call.
Step 1: Create a Java KeyStore formatted certificate
You'll need a couple of files to create your certificate. Usually, this is a .cer, .pem, or .key file (or a combination thereof). For the ADP APIs, I have a .pem and a .key file
- In the directory with your files (
.cer,.pem,.key), run the following command. Make sure to replace the file names with yours!openssl pkcs12 -export -in MyPemFile.pem -inkey myKeyFile.key -certfile myPemFile.pem -out myPKS12OutputFile.p12- When prompted, create a password.

- Convert the P12 (pks12) file to a
.jksfile (Java KeyStore formatted certificate) - Run the following command to convert the KeyStore, enter passwords when prompted (save this). Make sure to enter your file names!
keytool -importkeystore -srckeystore myP12File.p12 -srcstoretype PKCS12 -destkeystore myJKSCert.jks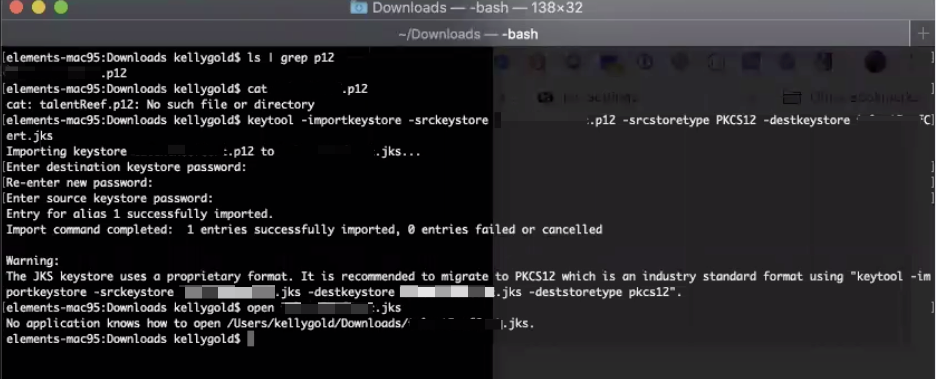 You should now have a
 .jksfile in the same directory.

 You should now have a
 Step 2: Configure the connector to accept our certificate, and finish authentication
The ADP connector authentication is as follows
- Make a POST to the /Token Endpoint (correct; do not authorize for ADP).
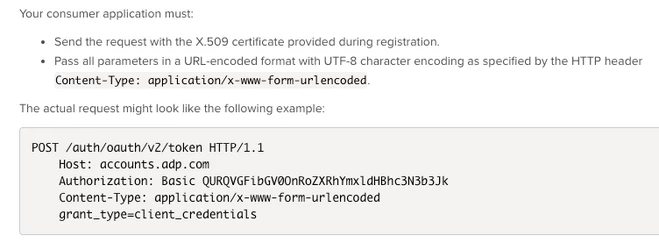
- Include a Basic HTTP Auth header with ClientID + Client Secret Base64 encoded with a colon between - ClientID:ClientSecret
- Include the certificate on the request.
- Set the returned Access_Token body parameter as the Authorization Bearer Token for ongoing requests.
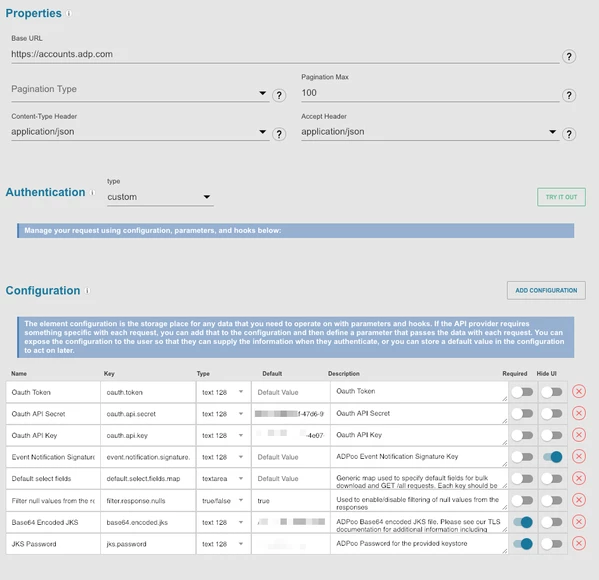
- Create a connector with custom authentication
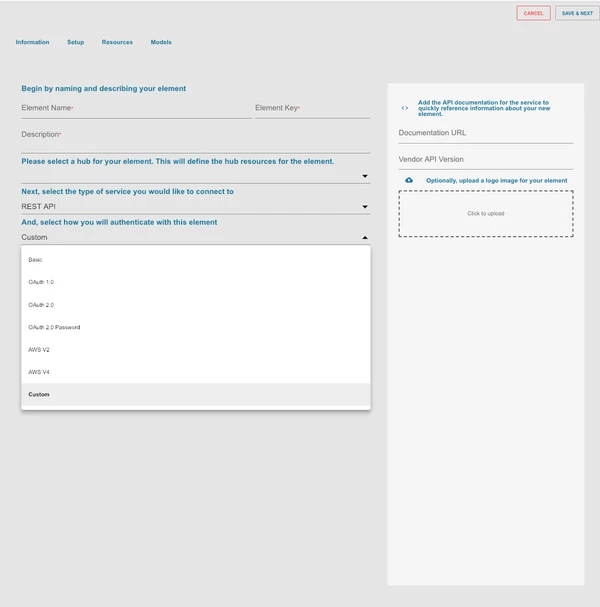
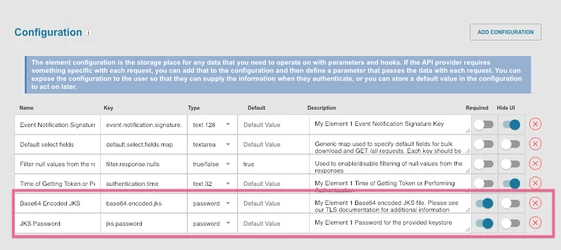
- In Setup>Configuration, select "ADD CONFIGURATION" and select "SSL". This should add two configuration items to our connector (
Base64.encoded.jksandjks.password)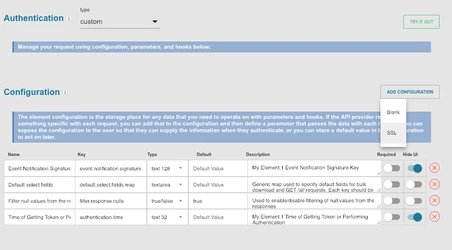
- Next, we'll need to add configuration for our ClientID, ClientSecret, and Access Token. You may choose to put default values for these for testing, although note that for a production-ready connector, they will need to be parameterized.
- Add a Global-Pre-Hook setting your Oauth Token to be sent in the Headers on a request
let Authorization = `Bearer ${configuration['oauth.token']}`;done({'request_vendor_headers': {Authorization}})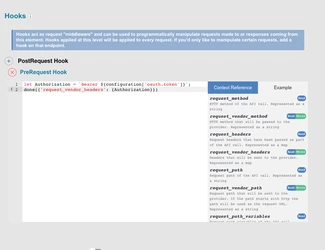
- Add a Global-Pre-Hook setting your Oauth Token to be sent in the Headers on a request
- Now that we've set up our configuration, we need to add an authentication resource and a bit of Javascript to make everything work.
- On Resources tab, Add a new resource (POST in ADP's case). This API should reflect the first call made to the vendor during authentication. Since we chose Custom, it's up to the developer to define how/what to call to retrieve the access token.
- Set the "Resource Type" to "On Provision", which will call this API when we provision a connector instance.
- Note the vendor requirements from the ADP API documentation:
- We still need to tell ADP our Grant-Type. To do this modify the Body "Parameter" on the connector resource we've created.
- (See the finished product for example)
- Last, add a bit of Pre-Hook Javascript to 1. Set the Basic Auth header on the provisioning request (1st request), and 2. Set the oauth.api.key to the
access_tokenreturned in the response.let Authorization = `Basic ${CE.b64(configuration['oauth.api.key'] + ':' + configuration['oauth.api.secret'])}`;done({'request_vendor_headers': {Authorization, 'Content-Type': 'application/x-www-form-urlencoded'}})
- Post-Hook Javascript:
if (response_iserror) done();done({'configuration': {'oauth.token': response_body.access_token}})
The Finished Auth Resource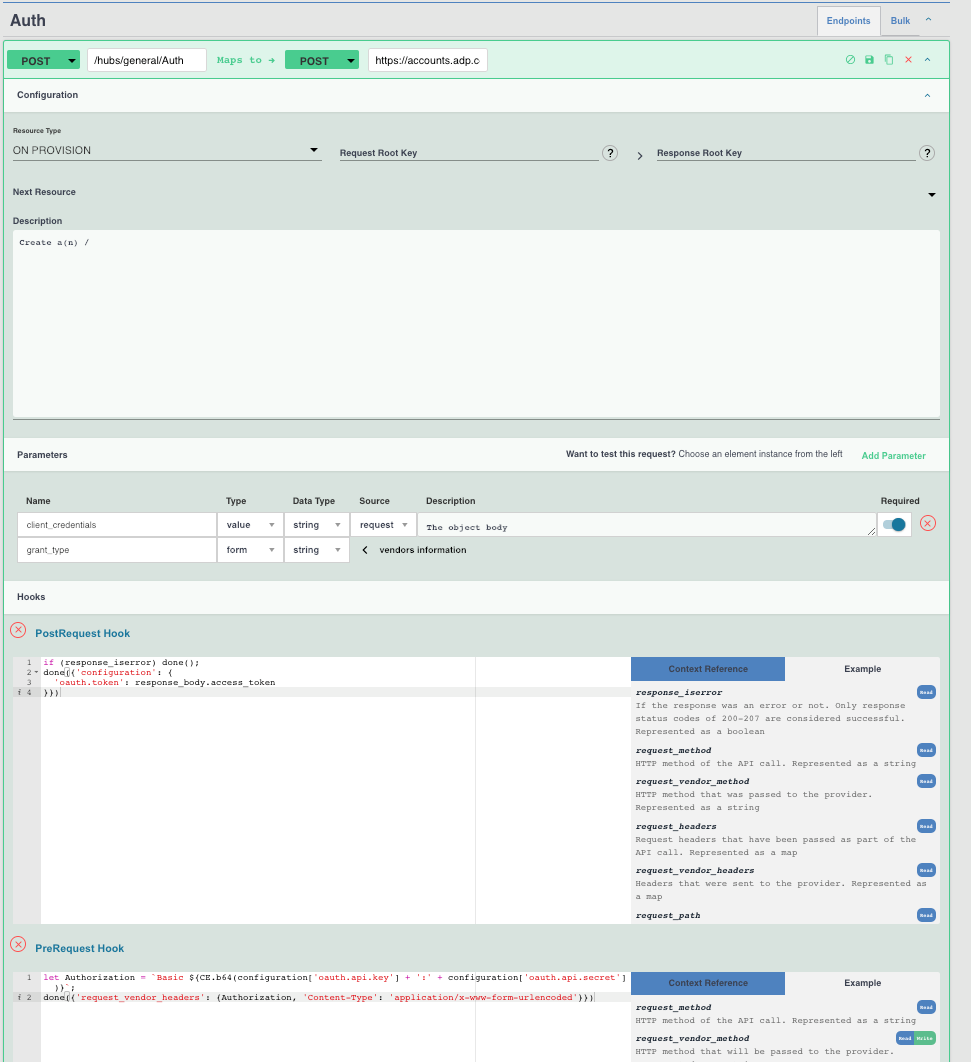


Step 3: Create an instance
- To create an instance (in this case, for ADP), enter the following:
- Base64 JKS (java KeyStore) file
- To base64 encode your keystore file, navigate to the directory and run:
base64 -i myJKSCert.jks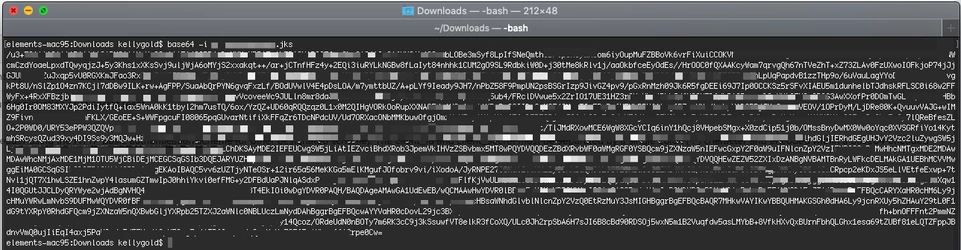
- JKS Password set when you created the KeyStore (jks) file
- ClientID
- ClientSecret
- Base64 JKS (java KeyStore) file


Step 4: Validate result by making a GET call

