SAP Open Connectors supports events via polling or webhooks depending on the API provider. For more information about our Events framework, see Events Overview.
Supported Events and Resources
SAP Open Connectors supports both polling and webhook events for Marketo.
Polling
After receiving an event, SAP Open Connectors standardizes the payload and sends an event to the configured callback URL of your authenticated connector instance.
You can set up polling for the events resource. You can also copy the events configuration to poll other resources. See Configure Polling Through API for more information.
Configure Polling Through the UI
To configure polling through the UI, follow the same steps to authenticate a connector instance, and then turn on events. Select the resources to poll, and then click Create Instance. For more information, see Authenticate an Connector Instance with Events (UI) or the connector-specific authentication topic.
Configure Polling Through API
In order to enable polling, add these extra configurations to your instance JSON:
"event.notification.enabled": "true",
"event.notification.callback.url": "<INSERT_YOUR_APPS_CALLBACK_URL>"
The default poller configuration is:
{
  "leads": {
    "url": "/lead-changes?where=lastChangeDate>'${gmtDate:yyyy-MM-dd'T'HH:mm:ss.SSS'Z'}'",
    "idField": "person.id",
    "datesconfiguration" : {
      "updatedDateField": "person-updatedAt",
      "updatedDateFormat": "yyyy-MM-dd'T'HH:mm:ss'Z'",
      "updatedDateTimezone": "GMT"
  }
 }
}
Instance JSON with polling events enabled:
{
  "element": {
    "key": "marketo"
  },
  "providerData": {
    "code": "<Code_On_The_Return_URL>"
  },
  "configuration" : {
      "oauth.api.key": "<INSERT_MARKETO_CLIENT_ID>",
      "oauth.api.secret": "<INSERT_MARKETO_CLIENT_SECRET>",
      "oauth.callback.url": "https://www.mycoolapp.com/auth",
      "marketo.identity.url":  "<INSERT_YOUR_IDENTITY_URL>",
      "marketo.rest.url": "<INSERT_YOUR_REST_URL>",
      "event.notification.enabled": "true",
      "event.vendor.type": "polling",
     "event.poller.refresh_interval":"15",
 "event.poller.configuration": "{\n \"leads\": {\n \"url\": \"/lead-changes?where=lastChangeDate>'${gmtDate:yyyy-MM-dd'T'HH:mm:ss.SSS'Z'}'\",\n \"idField\":\"person.id\",\n  \"datesConfiguration\": {\n \"updateDateField\": \"person.updatedAt\",\n \"updatedDateFormat\":\"yyyy-MM-dd'T'HH:mm:ss'Z'\",\n \"updatedDateTimezone\": \"GMT\"\n }\n }\n}",
  "event.notification.callback.url": "<INSERT_YOUR_APPS_CALLBACK_URL>"
  },
  "tags": [
    "<INSERT_TAGS>"
  ],
  "name": "<INSERT_INSTANCE_NAME>"
}
Webhooks
Create a Marketo instance with events enabled and supply your event notification url.
Step 1. Get Connectors OAuth Information
HTTP Header: None HTTP Verb: GET Request URL: /elements/{keyOrId}/oauth/url Request Body: None Query Parameters:
- apiKey– the key obtained from registering your app with the provider
- apiSecret – the secret obtained from registering your app with the provider
- callbackUrl – the URL that you supplied to the provider when registering your app, state – any custom value that you want passed to the callback handler listening at the provided callback URL.
Description: The result of this API invocation is an OAuth redirect URL from the endpoint. Your application should now redirect to this URL, which in turn will present the OAuth authentication and authorization page to the user. When the provided callback URL is executed, a code value will be returned, which is required for the Create Instance API.
Example cURL Command:
curl -X GET
-H 'Content-Type: application/json'
'https://api.openconnectors.us2.ext.hana.ondemand.com/elements/api-v2/elements/marketo/oauth/url?apiKey=insert_client_id&apiSecret=insert_client_secret&callbackUrl=https://www.mycoolapp.com/auth'
Response:
{
  "element": "marketo",
  "oauthUrl": "https://www.mycoolapp.com/auth?state=marketo&code=7AB987CDDNC"
}
Handle Callback from the Endpoint: Upon successful authentication and authorization by the user, the endpoint will redirect to the callback URL you provided when you setup your application with the endpoint, in our example, https://www.mycoolapp.com/auth. The endpoint will also provide two query string parameters: “marketo” and “code”. The value for the “state” parameter will be the name of the endpoint, e.g., “sfdc” in our example, and the value for the “code” parameter is the code required by SAP Open Connectors to retrieve the OAuth access and refresh tokens from the endpoint. If the user denies authentication and/or authorization, there will be a query string parameter called “error” instead of the “code” parameter. In this case, your application can handle the error gracefully.
Step 2. Create an Instance
To provision your Marketo connector, use the /instances API.
Below is an example of the provisioning API call.
- HTTP Headers: Authorization- User , Organization
- HTTP Verb: POST
- Request URL: /instances
- Request Body: Required – see below
- Query Parameters: none
Description: token is returned upon successful execution of this API. This token needs to be retained by the application for all subsequent requests involving this connector instance.
A sample request illustrating the /instances API is shown below.
HTTP Headers:
Authorization: User <INSERT_USER_SECRET>, Organization <INSERT_ORGANIZATION_SECRET>
This instance.json file must be included with your instance request. Please fill your information to provision. The “key” into SAP Open Connectors Marketo is “marketo”. This will need to be entered in the “key” field below depending on which connector you wish to instantiate.
{
  "element": {
    "key": "marketo"
  },
  "providerData": {
    "code": "<Code_On_The_Return_URL>"
  },
  "configuration" : {
      "oauth.api.key": "<INSERT_MARKETO_CLIENT_ID>",
      "oauth.api.secret": "<INSERT_MARKETO_CLIENT_SECRET>",
      "oauth.callback.url": "https://www.mycoolapp.com/auth",
      "marketo.identity.url":  "<INSERT_YOUR_IDENTITY_URL>",
      "marketo.rest.url": "<INSERT_YOUR_REST_URL>",
      "event.notification.enabled": "true",
      "event.notification.callback.url": "<INSERT_YOUR_APPS_CALLBACK_URL>"
  },
  "tags": [
    "<INSERT_TAGS>"
  ],
  "name": "<INSERT_INSTANCE_NAME>"
}
Here is an example cURL command to create an instance using /instances API.
Example Request:
curl -X POST
-H 'Authorization: User <INSERT_USER_SECRET>, Organization <INSERT_ORGANIZATION_SECRET>'
-H 'Content-Type: application/json'
-d @instance.json
'https://api.openconnectors.us2.ext.hana.ondemand.com/elements/api-v2/instances'
If the user does not specify a required config entry, an error will result notifying her of which entries she is missing.
Below is a successful JSON response:
Make Note of the Instance ID
{
/////////////////
// "id": 1234, // Make Note of Instance ID
/////////////////
  "name": "test instance",
  "token": "VAnlQ/V28PT+M62kdajlsd9088HHtUJai+Efq8=",
  "element": {
   "id": 46,

    "name": "Marketo",
    "key": "marketo",
    "description": "Marketo Software's provides easy and powerful marketing automation software with everything a marketer needs: email, social, analytics, lead management, and more.",
    "image": "elements/provider_marketo.png",
    "active": true,
    "deleted": false,
    "typeOauth": true,
    "trialAccount": false,
    "existingAccountDescription": "Give your application access to your existing
 Marketo accountEnter yourn  credentials and details for your Marketo Account",
    "configDescription": "If you do not have a Marketo account, you can create one at Marketon  Signup",
    "elementProvisionType": "OAUTH_TEMPLATE"
  },
  "provisionInteractions": [],
  "valid": true,
  "disabled": false,
  "maxCacheSize": 0,
  "cacheTimeToLive": 0,
  "cachingEnabled": false,
  "defaultTransformation": false
}
Note: Make sure you have straight quotes in your JSON files and cURL commands. Please use plain text formatting in your code. Make sure you do not have spaces after the in the cURL command.
Call GET /instances and get your instance ID for the Marketo instance you just created
Example Request:
curl -X GET
-H 'Authorization: User <INSERT_USER_SECRET>, Organization <INSERT_ORGANIZATION_SECRET>'
-H 'Content-Type: application/json'
'https://api.openconnectors.us2.ext.hana.ondemand.com/elements/api-v2/instances'
Retrieve the Instance ID and Base64 encode it. We recommend the site: https://www.base64encode.org/
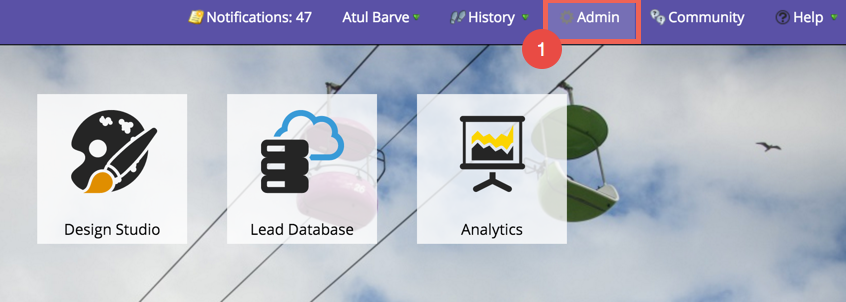
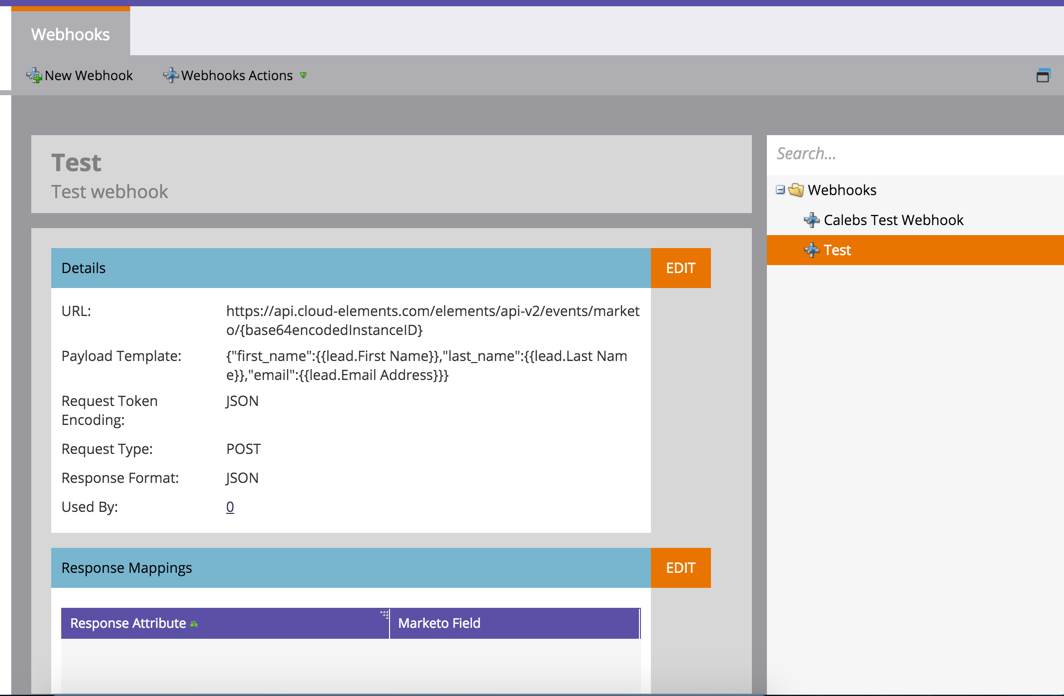
Log in to your Marketo Account and select “Admin”
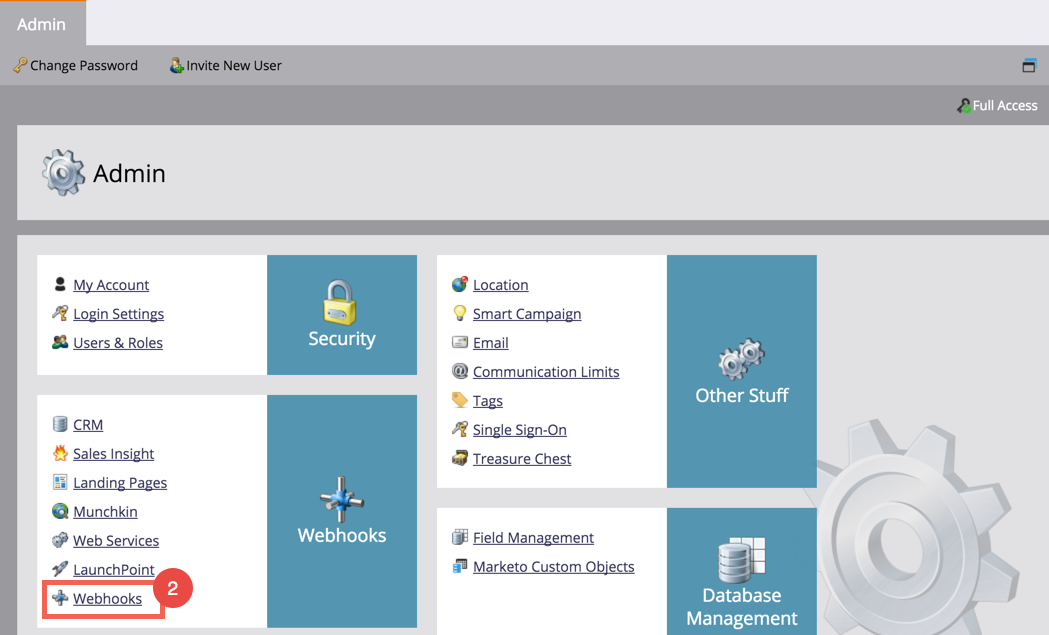
Select “Webhooks”
Select “New Webhook”

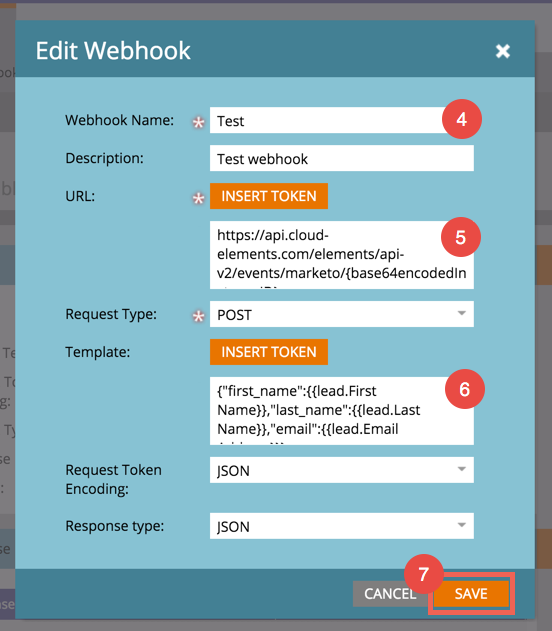
Name the webhook and give it a description Input the following URL:
https://api.openconnectors.us2.ext.hana.ondemand.com/elements/api-v2/events/marketo/{INSERT_BASE64_ENCODED_INSTANCE_ID} Select “POST” as the Request Type Input your desired template, example below:
{"first_name":{{lead.First Name}},"last_name":{{lead.Last Name}},"email":{{lead.Email Address}}}
Select JSON for “Request Token Encoding” as well as “Response Type” Select Save
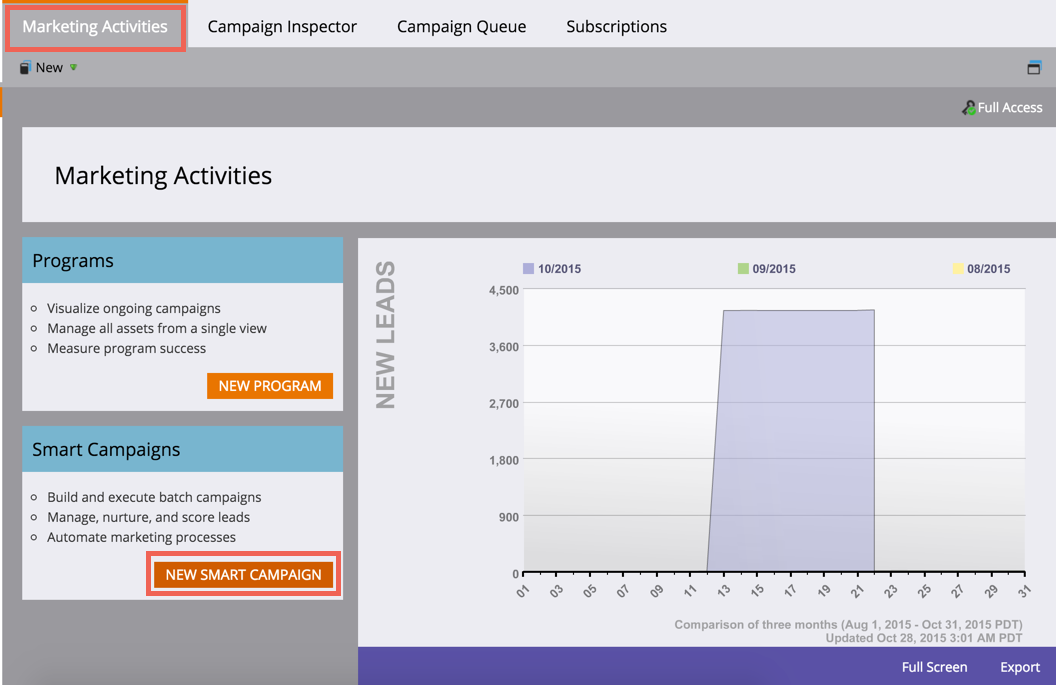
Select “Marketing Activities” from the main menu
Select “New Smart Campaign”
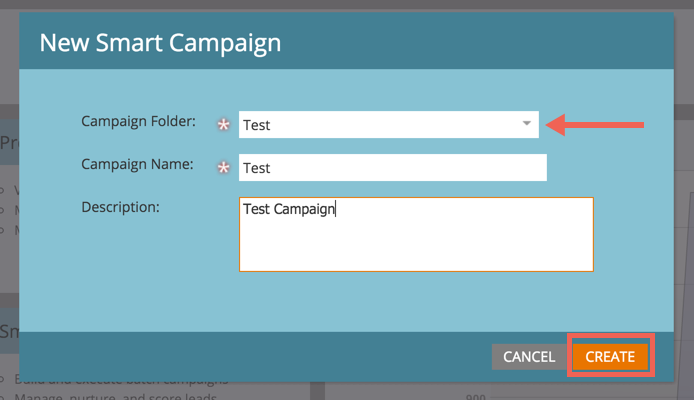
Select the newly created webhook for the “Campaign Folder” Name the campaign and give it a description
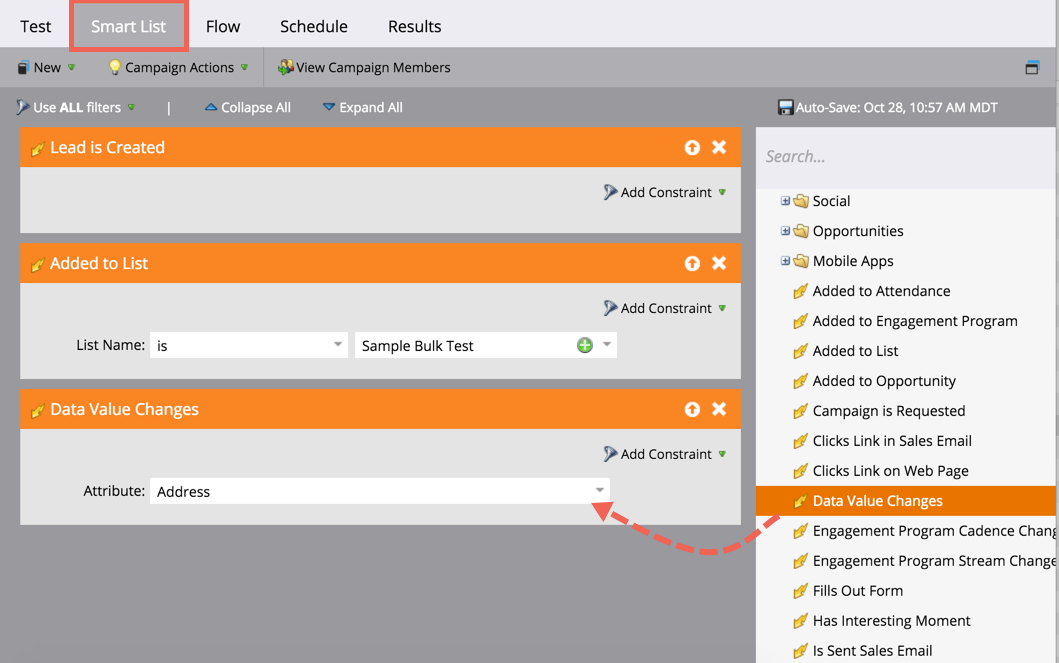
Select Smart List – “Who”
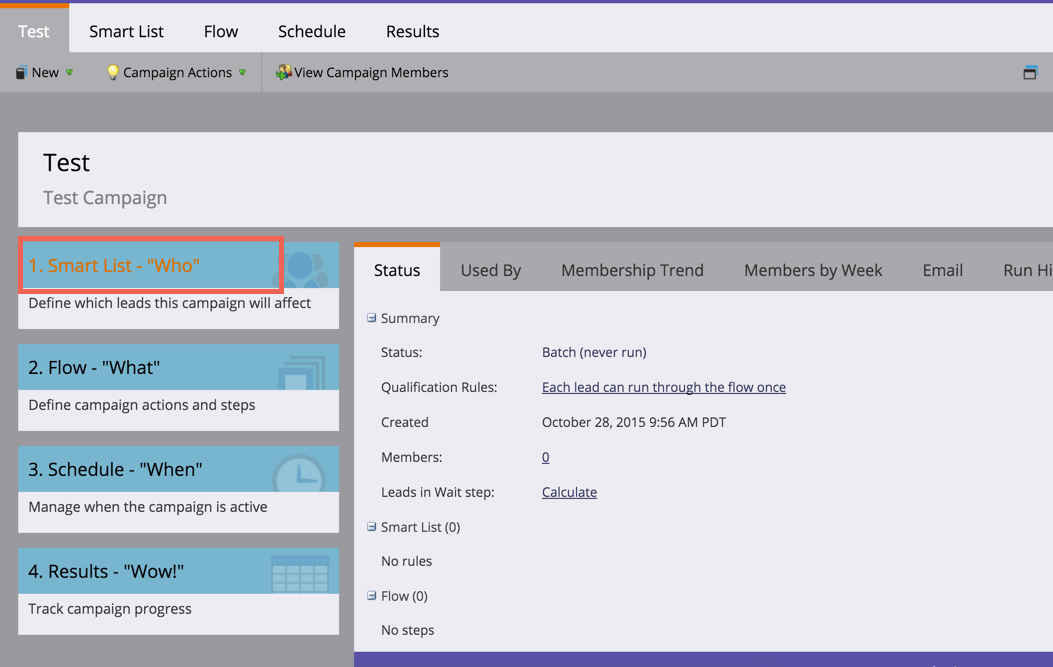
Drag and drop events you wish to associate with the campaign
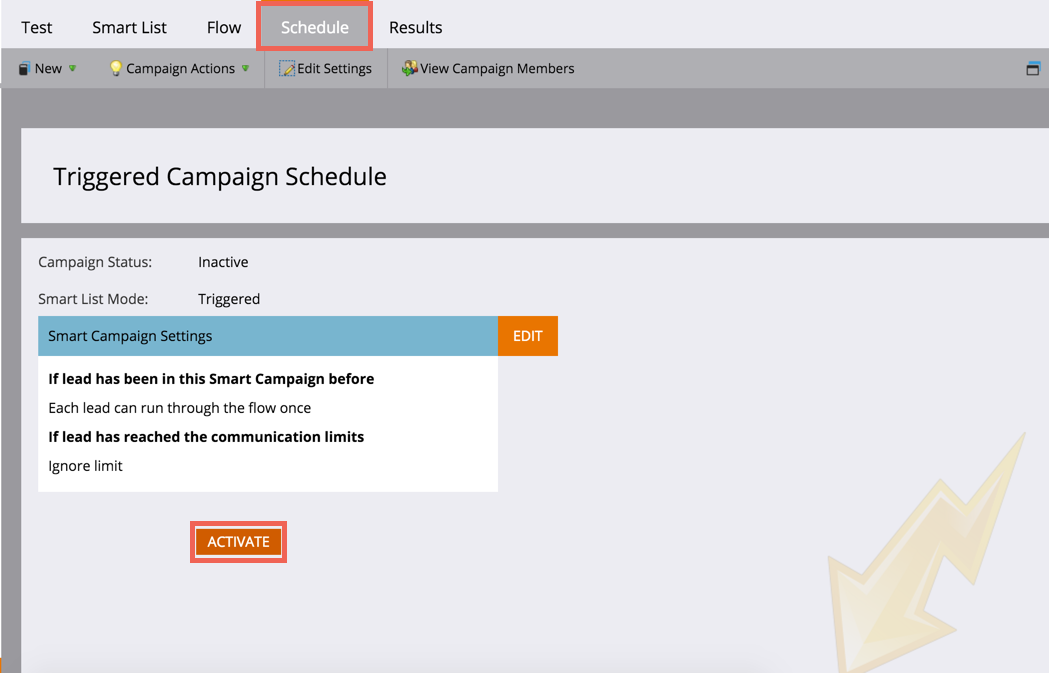
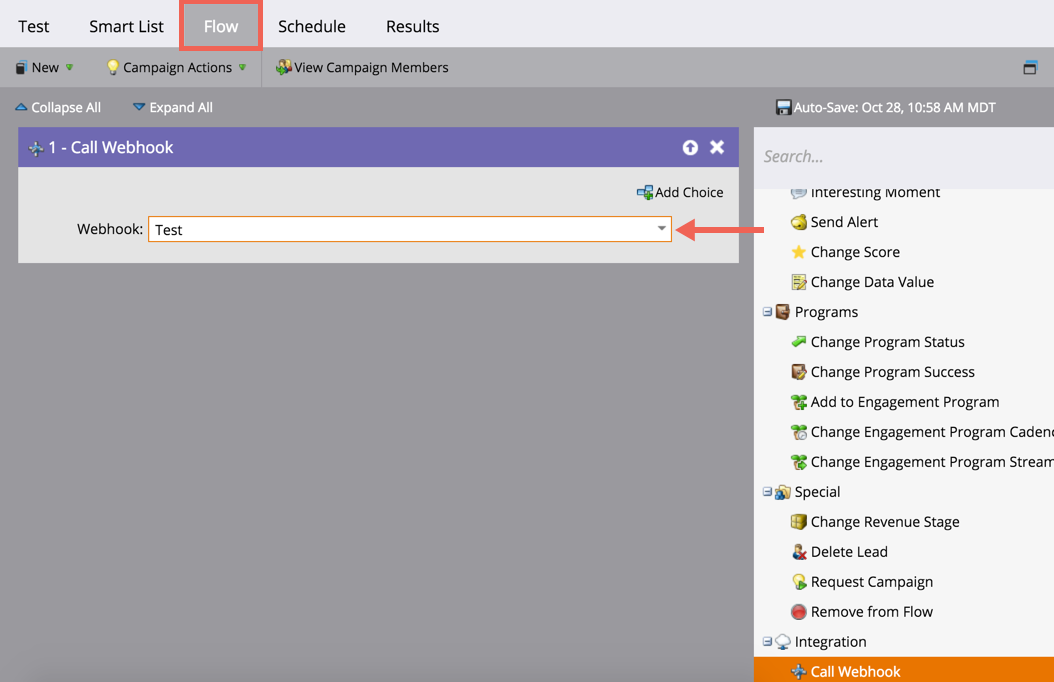
Select “Flow” Select the newly created webhook
Select “Activate”